Stores Management
The Store Management module enables the following:
- Add a new store
- Update existing store
- Retire a store
- Add a new cash register
- Retire a cash register
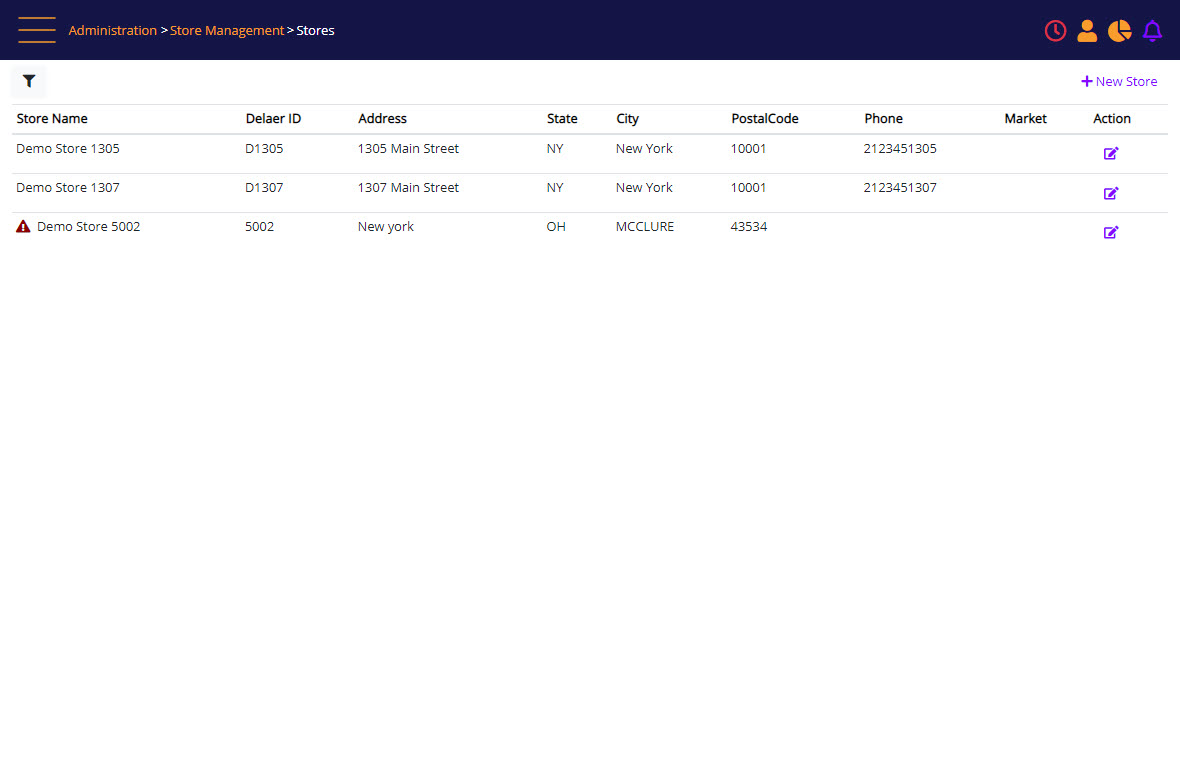
The Stores List screen enables you to look up and view basic store information, and proceed to the store management UI, to make modifications as needed, such as location contact information, phone no, dealer code etc.
In businesses where there is more than one store, stores have a hierarchy (a tree structure).
Each store has a parent location . The top of the hierarchy is the main office (usually used only by management).
Usually under the main location there are regional offices that can be used by regional management to monitor and manage the stores in their region. Each store has at least two child leaves:
- Inventory Adjustment Account – a virtual inventory location used for inventory adjust-in and adjust-out (shrinkage).
- Walk in account – a virtual account representing the walk-in customer. It is an internal account for the system. This is an entity that the system uses to manage all transactions.
These two accounts are automatic and invisible to the user.
Users can only view stores that they can access, and search is possible using the store ID, name, and wildcards.
The user can select one of the stores, and then select 'Edit', to make modifications to the store information.
Entry Point
Navigation menu > Administration > Store Management > Modify Store.

Stores screen

Screen Data Elements
|
Elements |
Type |
Action |
|
Search Store |
Expandable filter |
Search store filter |
|
New Store |
Hyperlink |
Open the Add Store interface |
|
License Warning |
Icon |
Notify about store license expiration |
|
Action menu |
Icon/Hyperlink |
Store action menu – opening the Edit Store interface |
Search Store filter

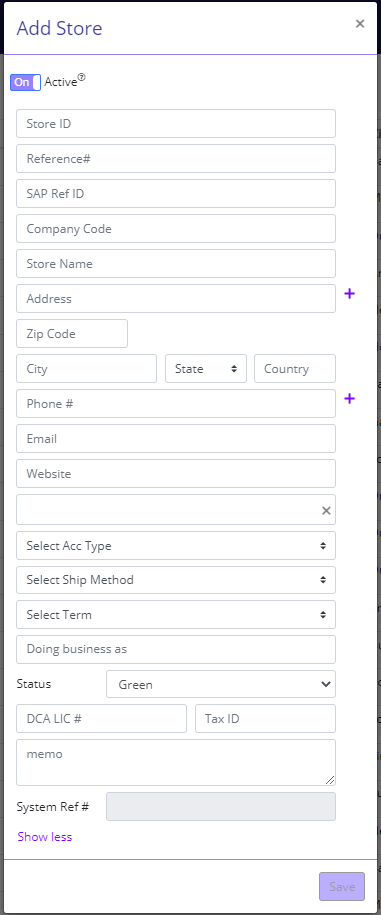
The following screen enables editing and creating new stores and virtual sites (I.E., regional HQ/Market).
The Store setup screen is opened from the Stores screen, by clicking the + New Store link, or by clicking Edit near the relevant store.
The Add Store and Edit Store screens enable you configure store and system-wide configurations, and is controlled by user roles.
Store options are saved to the database and can be managed centrally.
Store Setup

Screen Data Elements
|
Elements |
Type |
Action |
|
Active |
On/Off button |
mark store as Active |
|
Store ID |
Integer |
Store ID |
|
Reference # |
Alphanumeric |
Account reference number |
|
SAP Ref ID |
Alphanumeric |
SAP reference Number |
|
Company Code |
Alphanumeric |
Company Code |
|
Store Name |
Alphanumeric |
Name of the store |
|
Address |
Alphanumeric |
Store address; printed on the receipt |
|
ZIP Code |
Numeric |
5-digit zip code |
|
City |
Alphanumeric Max 50 Characters |
Store address – City |
|
State |
(2 characters) Select from list |
Two-letter abbreviation of the state |
|
Country |
Alpha |
Store address – country |
|
Phone # |
Numeric |
Store’s phone number |
|
Select Acc Type |
Select from list |
Store account type (franchisee, HQ, etc.) |
|
Select Ship Method |
Select from list |
Shipping method for purchase |
|
Select Term |
Select from list |
Payment terms for purchase |
|
Doing Business As |
Numeric 10 |
Name |
|
Status |
Select from list |
Green must be selected |
|
DCA LIC # |
Alphanumeric |
DCA License number |
|
Memo |
Alphanumeric |
Store email |
|
System Ref # |
Numeric |
System reference number |
|
Save |
Button |
Save the updates and close |